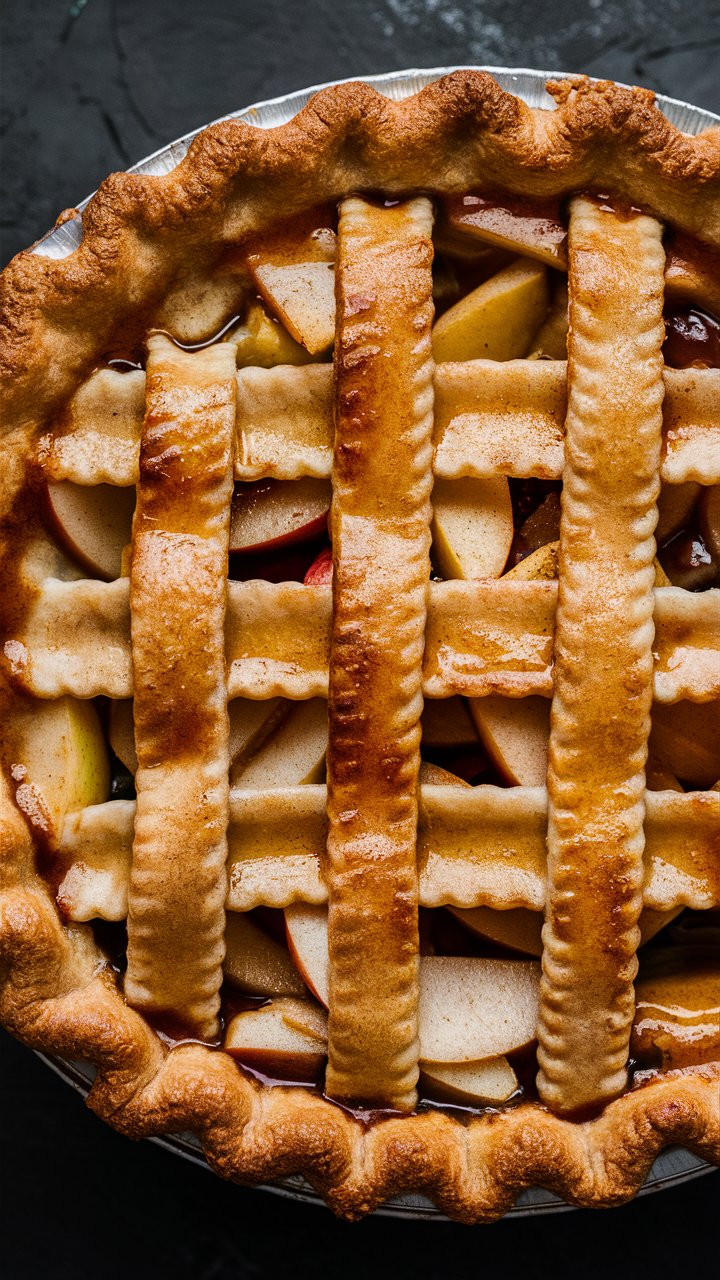
There are recipes you follow — and then there are recipes you feel. Grandma’s Apple Pie belongs to the second kind. One bite of this golden, buttery crust filled with tender, spiced apples doesn’t just taste like dessert — it tastes like home, like autumn afternoons, and like every warm memory from a kitchen filled with laughter and cinnamon.
This isn’t just another apple pie recipe; it’s a time-tested tradition, lovingly passed through generations, perfected by patience, and guided by the kind of wisdom you can’t find in cookbooks. And today, you’ll learn not just how to bake it — but how to make it taste exactly like Grandma’s did.
🍎 Why Grandma’s Apple Pie Is So Special
Every family has a recipe that holds its heart. For us, it’s this apple pie. What makes it special isn’t just the ingredients — it’s the method, the feeling, and the small secrets Grandma never wrote down but always remembered.
- She used cold butter and colder hands. That’s the secret to a crust that flakes perfectly with every forkful.
- She never rushed the apples. They were always peeled with care, tossed gently in sugar and spice, and rested just long enough for flavors to marry.
- She baked by instinct, not timers. She could tell when it was done by the smell filling the kitchen — that warm, caramelized perfume of apples, cinnamon, and love.
It’s more than baking — it’s a ritual. And in this recipe, you’ll learn each of those subtle techniques that transform a simple dessert into a comforting masterpiece.
🧈 Ingredients for the Perfect Apple Pie by Grandma
The success of any pie begins with the ingredients. Grandma always believed that simplicity breeds perfection. She used everyday ingredients, but her method made them extraordinary.
🥧 For the Crust
- 2½ cups all-purpose flour, spooned and leveled
- 1 teaspoon salt
- 1 tablespoon granulated sugar
- 1 cup cold unsalted butter, cubed (cold is key!)
- ¼ to ½ cup ice water (add gradually until dough holds)
💡 Pro Tip: Keep all ingredients cold — even the mixing bowl if possible. Cold fat equals flaky layers, and that’s non-negotiable in Grandma’s kitchen.
🍏 For the Filling
- 6–7 medium Granny Smith apples, peeled, cored, and thinly sliced
- ¾ cup granulated sugar
- 2 tablespoons all-purpose flour
- 1 tablespoon cornstarch (ensures thickness)
- 1 teaspoon ground cinnamon
- ¼ teaspoon nutmeg
- ¼ teaspoon allspice
- 1 tablespoon lemon juice (balances the sweetness)
- 1 teaspoon pure vanilla extract
- 2 tablespoons butter, cut into small cubes
- 1 egg (for egg wash, optional)
- 1 tablespoon coarse sugar (for a crisp, golden top)
🍎 Grandma’s Tip: Combine tart and sweet apples for depth of flavor. Granny Smith provides tartness; Honeycrisp or Golden Delicious add natural sweetness and juiciness.
⏱️ Preparation & Baking Time
- Preparation Time: 45 minutes
- Chilling Time: 30 minutes
- Baking Time: 55 minutes
- Total Time: 1 hour 45 minutes
⏰ Resting the dough before rolling helps the gluten relax and keeps the crust tender and uniform.
🪄 Step-by-Step Instructions: How to Make Grandma’s Apple Pie
Here’s where precision meets love. Follow these steps carefully — but don’t be afraid to infuse your own rhythm into the process.
🥣 Step 1: Make the Dough
In a large bowl, whisk together the flour, salt, and sugar. Add the cold butter and cut it into the flour using a pastry cutter or your fingertips until the mixture resembles coarse crumbs with pea-sized butter bits.
Drizzle in the ice water, one tablespoon at a time, and mix until the dough just comes together. Divide it into two equal discs, wrap each in plastic, and refrigerate for at least 30 minutes.
👵 Grandma’s Secret: “Never knead your dough. Just bring it together. The less you touch it, the flakier it’ll be.”
🍏 Step 2: Prepare the Apple Filling
In a large bowl, toss the sliced apples with lemon juice and vanilla extract. In a separate small bowl, whisk together sugar, flour, cornstarch, cinnamon, nutmeg, and allspice. Combine both mixtures until apples are evenly coated.
Let them sit for 10–15 minutes — this draws out natural juices that blend beautifully into a glossy, thick filling during baking.
🍞 Step 3: Assemble the Pie
- Preheat your oven to 425°F (220°C).
- Roll out one dough disc on a lightly floured surface into a 12-inch circle.
- Gently transfer it to a 9-inch pie dish, pressing into the bottom and sides.
- Spoon the apple filling evenly, mounding slightly in the center.
- Dot the apples with small butter cubes for richness.
🧡 Tip: For perfect lattice, cut the second dough disc into even strips. Weave them over the filling, or place a full top crust with vent slits for a classic look.

🥚 Step 4: Add Finishing Touches
Brush the top with egg wash (or plant milk for vegan version) and sprinkle with coarse sugar. This creates a golden, crisp crust with sparkle.
Crimp or flute the edges for that classic Grandma finish.
🔥 Step 5: Bake to Perfection
Bake at 425°F for 20 minutes, then reduce temperature to 375°F and continue baking for 30–35 minutes.
The crust should be golden brown, and the filling should bubble through the vents — that’s your cue it’s done!
If the edges brown too fast, cover them with foil to prevent overbaking.
🧊 Step 6: Cool and Serve
Allow the pie to cool on a wire rack for at least 2 hours. This helps the filling set and the flavors deepen. Cutting too soon will make the filling runny — patience pays off here.
Serve warm, topped with vanilla ice cream, whipped cream, or even a slice of cheddar cheese (a nostalgic New England twist).
🍽️ Nutritional Information (per slice)
| Nutrient | Amount |
|---|---|
| Calories | 340 |
| Total Fat | 16g |
| Saturated Fat | 10g |
| Cholesterol | 45mg |
| Sodium | 200mg |
| Carbohydrates | 46g |
| Fiber | 3g |
| Sugar | 25g |
| Protein | 3g |
⚖️ This recipe provides around 15% of daily Vitamin C and 8% of your fiber intake — without artificial additives or corn syrup.
🌿 Healthier & Modern Variations
Even Grandma appreciated a good twist now and then! You can easily make this classic more modern and diet-friendly.
- Gluten-Free: Substitute flour with a 1:1 gluten-free blend and add ¼ teaspoon xanthan gum.
- Lower Sugar: Use ½ cup sugar instead of ¾ — the natural sweetness of apples compensates beautifully.
- Vegan: Use plant-based butter and almond milk for the wash.
- Whole Wheat: Replace half of the all-purpose flour with whole wheat pastry flour for a nutty flavor.
- Naturally Sweetened: Swap sugar for coconut sugar or pure maple syrup for deeper flavor notes.
💡 Pro Tips for a Flaky Crust
- Use cold ingredients.
The colder the butter and water, the flakier the crust. - Don’t overwork the dough.
Overmixing develops gluten, which makes crust tough. - Rest the dough.
Chill before and after rolling for the best texture. - Bake on a lower rack.
This ensures the bottom crust cooks fully — no soggy bottoms! - Brush edges mid-bake.
A light butter brush 20 minutes in gives shine and flavor.
🍯 Serving Suggestions
Transform a slice into a memorable experience with these pairings:
- Classic: A scoop of vanilla bean ice cream melting into warm apple filling.
- Comfort Style: Drizzle with salted caramel sauce.
- Rustic Elegance: Pair with aged cheddar cheese for a bold contrast.
- Brunch Version: Serve cold with Greek yogurt and honey.
- Party Platter: Cut into mini slices, dust with powdered sugar, and serve with espresso shots.
❌ Common Mistakes to Avoid
- Warm butter or overmixing the dough — ruins flakiness.
- Skipping thickeners — results in soupy filling.
- Uneven apple slices — causes uneven baking.
- Underbaking — crust stays pale and soggy.
- Cutting too soon — filling will spill instead of setting.
🧺 Storage & Reheating
| Storage Method | Duration | Instructions |
|---|---|---|
| Room Temperature | 2 days | Cover loosely with foil or plastic wrap |
| Refrigerator | 5 days | Store in airtight container |
| Freezer (Unbaked) | 3 months | Wrap tightly, freeze, bake from frozen |
| Freezer (Baked) | 4 months | Thaw overnight, reheat at 350°F for 15 mins |
💬 Tip: Always reheat in an oven, not a microwave — it keeps the crust crisp and flaky.
🧁 Frequently Asked Questions (FAQ)
Q1: Can I make the dough ahead of time?
Yes! You can refrigerate it for up to 2 days or freeze it for a month.
Q2: Which apples are best for this pie?
Granny Smith for tartness, Honeycrisp or Jonagold for sweetness. Mixing them gives a perfect balance.
Q3: Why is my crust shrinking?
You likely didn’t rest the dough enough. Always chill before baking.
Q4: Can I reduce the sugar?
Yes — up to 25% less without losing flavor. Increase cinnamon slightly to balance sweetness.
Q5: What’s Grandma’s biggest secret?
Patience. From chilling the dough to cooling the pie, every resting step improves texture and flavor.
🕯️ Conclusion: More Than a Recipe
Grandma’s Apple Pie is more than pastry and fruit — it’s memory, love, and legacy baked into every slice. The smell alone carries nostalgia, the first bite reminds you of comfort, and the last crumb tells you it was worth every minute.
When you bake this pie, you’re not just making dessert — you’re continuing a story that started generations ago. So roll up your sleeves, trust the process, and let your kitchen fill with the scent of apples and home.
Grandma’s Secret: The Best Apple Pie by Grandma Recipe — a dessert that has stood the test of time, evolving gently but never losing its heart.
🧡 Try it once, and it will become your family’s tradition, too.